Scraping Amazon Product Reviews: A Guide to Success
How to Extract Amazon Product Reviews from a Logged-In Account
Have you ever wanted to get your hands on all those juicy Amazon product reviews, but found yourself stuck behind a pesky login screen? Well, fret no more, my friends, because I’m about to let you in on a little secret – how to scrape Amazon product
If you’re into web scraping, then you must be aware of the goldmine that is Amazon. With billions of product pages being scraped every month, it’s safe to say that Amazon is the most popular e-commerce website for web scrapers. And guess what? It’s not just the product pages that can be scraped. Amazon is also home to a treasure trove of product reviews, which can be a game-changer for market research and competitor monitoring endeavors.
You might be wondering, how can you extract relevant data from Amazon’s website and save it in a format that’s easy to manage? Well, my friend, it’s simpler than you think. You can actually scrape Amazon product reviews and save them in a neat spreadsheet or JSON format. And to add even more convenience, you can automate this process to update the data regularly. Talk about efficiency!
Now, here’s where it gets interesting. Scraping Amazon product reviews is not always a walk in the park, especially when a login is required. But fear not, because in this guide, I’ll spill the beans and show you how to scrape Amazon product reviews behind a login. Yep, you heard me right. I’ll teach you the whole shebang – from the process of logging in to parsing the review data and exporting those juicy reviews to a CSV file.
But before we dive into the nitty-gritty, let’s get our tools ready. We’ll be using the Node.js Puppeteer library, which is like a trusty sidekick for web scraping adventures. So, make sure you have Node.js installed on your system. If you don’t, head over to the official Node.js website and get it installed. Once Node.js is up and running, it’s time to bring Puppeteer into the mix. Puppeteer is a lifesaver when it comes to automating tasks and interacting with dynamic web pages. So go ahead and install it like a pro.
To set up your project, open a terminal and create a new folder with any name you fancy. In my case, I’ll go with the stunning name “amazon_reviews.” Feeling the anticipation building up? We’re just getting started. Now, change your current directory to the folder you just created. Easy peasy, right?
Alright, now we’re in the right place. Let’s get this party started by initializing the package.json file using a magical command: npm init -y. This command will create the package.json file in all its glory. But wait, there’s more! To make Puppeteer an official member of our party, we need to install it. Just run npm install puppeteer and watch the magic happen.
Now that we’re all set up and ready to roll, let’s take a moment to appreciate our neat little folder structure. Open it in any code editor of your choice and create a new JavaScript file called index.js. Voila! Your hierarchy should look like a well-organized masterpiece, with the “node_modules,” “index.js,” “package-lock.json,” and “package.json” files all in place.
Pat yourself on the back, my friend, because you’ve successfully completed the setup. We’re now primed and ready to unleash our web scraping skills.
But hold on a second! Before we embark on this thrilling adventure, make sure you have an account on Amazon. Trust me, you’ll need it to proceed with the rest of this tutorial. So go ahead, create an account or dust off the cobwebs from your existing one.
Now that all the stars have aligned and we’re ready to conquer the world of Amazon product reviews, let’s get started with the step-by-step process.
Step 1: Be Granted Access to the Public Page
To kick things off, we’ll start by scraping the reviews of a specific product. Picture this: you’re about to scrape the reviews of a pair of mind-blowing headphones. Here’s the product URL: https://www.amazon.com/ENHANCE-Headphone-Customizable-Lighting-Flexible/dp/B07DR59JLP/. Exciting, right?
But before we can dive into those reviews, we need to log in to Amazon. Once you’re logged in, we’ll redirect you to the product URL, and that’s where the magic happens.
Step 2: Secretly Scrape Behind the Login
Now, here’s where things can get a little tricky. Amazon’s login process is like a multi-stage adventure that requires users to enter their email or username, click a Continue button to enter their password, and finally submit it. It’s like jumping through hoops in a circus, but we’ll handle it like seasoned performers.
To enter your email ID, use the selector input[name=email]. Go on, slay that email field!
Once you’ve conquered the email field, it’s time to click on the Continue button and proceed to the next page. You can achieve this mighty feat by using the selector input[id=continue]. Feel the power surge through your veins as you click that button.
Now, behold! You’ve arrived at the next page, where you’ll unleash your password skills. Use the selector input[name=password] to enter your password. That’s right, show your password who’s the boss!
Now, it’s time for the final act. Click on the glorious Sign In button using the selector input[id=signInSubmit]. Yes, you’re moments away from scraping that sweet review data!
If you’re curious and itching to see the code for the login process, here it is:
const selectors = {
  emailid: 'input[name=email]',
  password: 'input[name=password]',
  continue: 'input[id=continue]',
  signin: 'input[id=signInSubmit]',
};

await page.goto(signinURL);
await page.waitForSelector(selectors.emailid);
await page.type(selectors.emailid, "[email protected]", { delay: 100 });
await page.click(selectors.continue);
await page.waitForSelector(selectors.password);
await page.type(selectors.password, "mypassword", { delay: 100 });
await page.click(selectors.signin);
await page.waitForNavigation();
We’re walking you through each step, just like a dance instructor. First, we go to the sign-in URL, enter the email ID, and tap into that Continue button. Then, we bravely enter the password, click the Sign In button, and wait for a moment while the sign-in process works its magic.
Once the sign-in process is completed, you’ll be redirected to the product page, where you’ll finally get to unleash your scraping powers upon the reviews.
Step 3: Enter the Review Data Matrix
Congratulations! You’ve made it to the product page, where all those glorious reviews are waiting to be scraped. Remember, your mission is to extract the author’s name, review title, and date from each review. It’s like being a detective who gathers clues from every nook and cranny.
On the page, you’ll notice that the reviews are neatly packaged within a parent <div> with the ID cm-cr-dp-review-list. This parent <div> holds all the reviews in an organized fashion. If you want to get your hands on more reviews, you’ll need to navigate to the next page using the pagination process that Amazon provides.
To extract the reviews, you can use the selector #cm-cr-dp-review-list div.review. This selector tells us to search for all the <div> elements that have the class review within the cm-cr-dp-review-list component. Imagine them as individual treasure chests, waiting to be opened!
But wait, there’s more to this treasure hunt. We have a few other selectors that we can use to extract specific data. We’ve got the following:
const selectors = {
  allReviews: '#cm-cr-dp-review-list div.review',
  authorName: 'div[data-hook="genome-widget"] span.a-profile-name',
  reviewTitle: '[data-hook=review-title]>span:not([class])',
  reviewDate: 'span[data-hook=review-date]',
};
These selectors will be your trusty sidekicks as you dig deeper into each review. Each selector serves a specific purpose:
-
To parse the author’s name, we use the selector
div[data-hook="genome-widget"] span.a-profile-name. This selector guides us to the<div>element with the attributedata-hookset togenome-widget, which holds the names. Then, we search for the<span>element with the class namea-profile-name, which contains the author’s name. -
To parse the review title, we use the CSS selector
[data-hook="review-title"] > span:not([class]). This selector tells us to search for the<span>element that is a direct child of the[data-hook="review-title"]element and does not have a class attribute. It’s like finding those hidden gems among the crowd. -
To parse the date, we use the CSS selector
span[data-hook="review-date"]. This selector directs us to the<span>element with thedata-hookattribute set toreview-date. This is the element where the review date resides.
Now that you have a good grasp of these selectors, let’s put them into action:
For each review element, we’ll perform the following steps:
for (const reviewElement of reviewElements) {
  const author = await reviewElement.$eval(selectors.authorName, (element) => element.textContent);
  const title = await reviewElement.$eval(selectors.reviewTitle, (element) => element.textContent);
  const rawReviewDate = await reviewElement.$eval(selectors.reviewDate, (element) => element.textContent);

  // Some regex magic to extract the date from the entire text

  const datePattern = /(\w+\s\d{1,2},\s\d{4})/;
  const match = rawReviewDate.match(datePattern);
  const reviewDate = match ? match[0].replace(',', '') : "Date not found";

  // Combine the data and push it to the final list

  const reviewData = {
    author,
    title,
    reviewDate,
  };

  reviewsData.push(reviewData);
}
Here’s what’s happening behind the scenes. We’re traversing through each review element using a loop, where each element represents an individual review. For each review element, we extract the author’s name, review title, and raw review date.
But wait! We need to work some magic on that review date. Since Amazon tends to include additional information like the location, we need to use a regular expression to extract just the date. Then, we store the processed data in a neat little object called reviewData and push it to the final list reviewsData.
After running this process for all the reviews on the current page, you’ll end up with a JSON-formatted collection of reviews that’s more delightful than a piñata filled with candy:

Now that you’ve successfully extracted and parsed the relevant data, it’s time to take it one step further.
Step 4: Unleash the Power of CSV
Sure, JSON is great and all, but let’s face it, it’s not the easiest format to work with when it comes to readability and versatility. That’s where our CSV superhero comes to the rescue. By converting our JSON data into CSV format, we can make it more readable and easily digestible for various purposes.
There are countless ways to convert JSON data to CSV, but we’ll stick to a simple and effective approach. Here’s a snippet of code that does the trick:
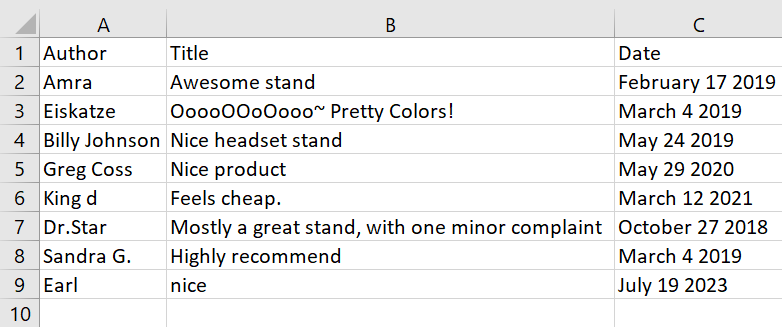
let csvContent = "Author,Title,Date\n";

for (const review of reviewsData) {
  const { author, title, reviewDate } = review;
  csvContent += `${author},"${title}",${reviewDate}\n`;
}

const csvFileName = "amazon_reviews.csv";
await fs.writeFileSync(csvFileName, csvContent, "utf8");
You see what we did there? We created a csvContent variable and initialized it with the column headers: “Author, Title, and Date.” Then, we traverse through each review in reviewsData and append its author, title, and review date to csvContent. Each review has its own line, separated by good old-fashioned line breaks.
And presto! When you execute this code, you’ll end up with a shiny CSV file, sleek and ready for action:
And there you have it! You’ve conquered the world of web scraping, specifically when it comes to scraping Amazon product reviews behind a login using Puppeteer. You’ve learned how to log in like a pro, parse relevant data with pinpoint accuracy, and elegantly save it to a CSV file.
But remember, my friend, this is just a taste of what you can achieve. If you want to level up your scraping game, try extracting all the reviews from all the pages using the pagination feature. The possibilities are endless, filled with insights and information waiting to be discovered.
So go forth, unleash your scraping powers, and explore the vast world of Amazon reviews!
Have you tried scraping Amazon product reviews before? Any funny or thrilling stories to share? Leave a comment and let’s start a conversation!


Leave a Reply